Showing posts with label dog. Show all posts

Monday, 14 November 2011

What's elven for clubfoot? And tiny wooly mammoths!!!

Parents brought the dog up the other day so we could all go to the pub together. Nice dog friendly pub around here. There were quite a few dogs inside and at a point we were all caught in the middle of a huge dog scuffle as they decided to meet greet and try to play in between our tables.

We had to wander outside to let destructo pup run around the little field behind the pub and calm down. Imagine our surprise when some wooly cows wandered up! Imagine a tiny wooly mammoth. It was awesome! Father had his super camera with him and managed to get lots of excellent photos.

Unfortunately father is a child and only sent me photos of the tiny mammoths humping each other.


He sent me this photo of dog though so all is forgiven. She is so cute and stupid :3


Onto elves! After being transported everywhere during the holidays my little box of elves had taken a beating and was being held together by hope and sticky tape.


As I said in my previous post the elves are surprisingly nice sculpts, although they do have a couple of horrible flaws, and there was little prep to do. I decided to try doing zenithal priming this time. Zenithal lighting refers to lighting that comes from above - like the sun or an overhead light, and the general shadows and highlights things have. I use undershading to help me do it - where you apply primer or a monochromatic basecoat that decides where the highlights and shadows fall and then glaze over it so it shows through.

I did it by priming black using plasticote, then using a white primer lightly dusting from above to a maximum of a 45 degree angle over the models. This was the general results.


I went a bit too heavy with the white by mistake. It really only needs to be a fine dusting over the raised parts - the spotty ness really doesn't matter. He kindof looks like he's got snow on his shoulders!

I picked out three models to use as tests and got started on the coat with 1:1:2 paint:matte medium:10% flow mixtures. It took a fair number of layers but it had a good consistency and went on very smoothly. I anticipate actually covering up the priming by doing manual highlighting and shading but that's because a) I still love doing excessive amounts of painting and layering and b) covering the priming doesn't bother me, I'm mainly using it to see where shading falls. Normally people use pre shading for speed painting, but I'm not at the moment.


To start with I worked on their inner cloak, using P3 frostbite. I want to highlight it up to white but the frostbite with give me a nice subtle blue to work up from and help tie the model together. I was careful to make sure each layer was fully dry before applying the next otherwise you just end up pushing pigment around and end up with chalkiness that's hard to cover.

Then I worked on the first colour of the cloak using P3 arcane blue. Finally I went over the metals and armour with boltgun. I can't decide yet whether I went the armour to be gold or silver or a mix. I figured I could base with silver to get a feel for it and then try gold. These are test models so I'm trying to make myself be more bold with colour choices. Gonna slather gold everywhere tomorrow!


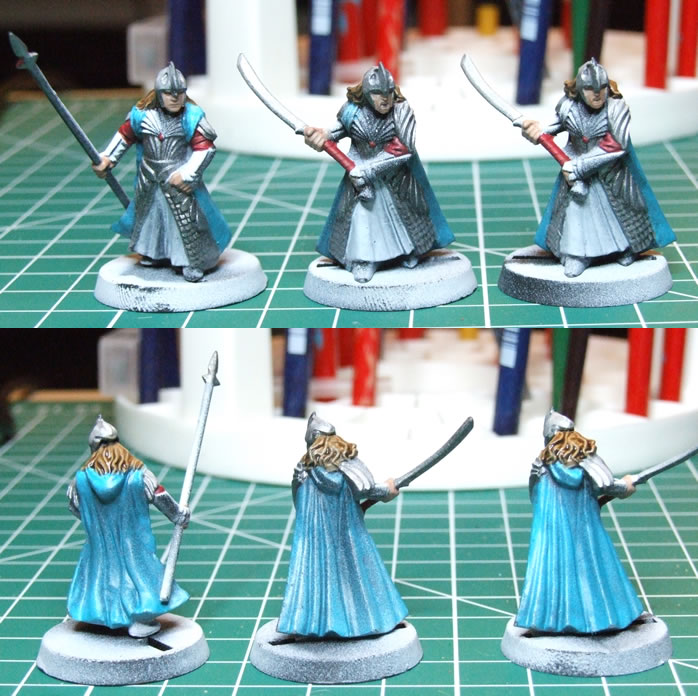
The hair was done with graveyard earth then a careful devlan mud wash. Originally I was going to use grypphonne sepia but I couldn't find it. I'm glad - the devlan mud looks much nicer. Skin was done with tallarn flesh and much cursing. I'm having trouble keeping my paints at a nice consistency and not having the paint just dribble everywhere.

It's not a problem on any other part of the models apart from the darn flesh bits!

The tiny gem at the centre of the breast plate and the cloth on the arms between armour sections was painted with scab red to compliment the turquoise and blue colours and draw the eyes upwards towards the centre of the model. I'm going to use browns with red base through the model as well such as on the shoes and wooden parts of the bows to further unify the paint scheme.

Overall these are really pleasant to paint and I'm looking forward to get some more done on them tomorrow.

Wednesday, 21 September 2011

Corking it up when I'm going down

I finally bought cork! For twice as much as I could get it online! They always say impatience is a virtue. Found out modelzone have also started selling plasticard, but at £2 an A4 sheet which is ridiculously expensive! You can get the same stuff 20p per sheet off ebay!

Anyway. I also purchased some talus and fine buff, finally giving in to my desire to make sand/egyptian/desert bases. I had a peer at all the tomb kings stuff today as well and I really love it. I see some of those models appearing in my room at some point soon.

Had great fun making a set of bases today and actually got alot more done in a much shorter time than I have done for a couple of weeks. They are currently drying on the floor after their first layer of ink wash. Here's what I've done and how I did it so far;


Cork!
 The cork I bought is quite a finely milled grain. I'm looking to pick up a variety of different grains and thicknesses to make adding character to my bases easier. It's easy to rip off the main roll and pull pieces off to work with.
Getting ideas for final compositions
I played about with the various chunks I pulled off. These are terminator bases. It's always best to have a little play before you glue anything down.
Gllluuuueeee!
I splodge glue everywhere when making these. Because I'm going to be throwing on sand and rocks soon after, there's no need to be careful about whether the glue is going to squish out the edges of the cork - I'm going to be surrounding it with glue anyway! For some pieces it's easier to put the glue on the cork pieces.

Ready to get my tallus on

And here's the point where I don't appear to have any more photos! I added the larger tallus stones first. Only a few here and there, mostly around the edges of the pieces of cork to make it look like stone that had broken away or crumbled down abit. The larger it is the more sparingly you should use it; it's difficult to use too much sand but easy to throw too many giant rocks on something! Then I glued some of the even smaller rocks around those to look like further breakage and scattering. Finally all the base left showing was covered with pva and had the fine ballast poured over.

The ballast I used was actually cheaper, smaller grained, and generally nicer than most sands I've seen.

Mmm sandy
Here's the bases all stoned up! I threw a random square base on there because I was having fun but ran out of terminator ones. I actually also built a set of the little normal space man bases but didn't photo them.

To help ensure all of the sand was firmly bonded, and to begin the basecoating, I made up an ink wash of 4:2:1 burnt umber: raw sienna: sepia inks thinned with a little bit of matt medium and a splodge of 10% flow. I dolloped it over everything.

The sand and cork are both quite absorbant, so it's important you put something on them before you begin painting properly. Most people use a wash of thinned pva glue, some use ink washes. Some don't and end up with crappy spongey bases - it is completely up to you.

I'm looking forward to painting them tomorrow and making some more! I've even got the golden grass to go in and look all dead and dry.

Cutest curious puppy ever

Saturday, 6 August 2011

Melt Man, with the power to Melt!

So still didn't have a chance to paint today - too much work to do, and packing. Heading home for a couple of weeks tomorrow. All my lovely brushes and paints are boxed up. As is all my underwear... damn!

I have 6 orks basecoated though; 3 white and 3 black. I need to do an update post with the chaos marine army I won off ebay on. It's huge for the price I paid, but good god loads of the models are in a hideous stat. Badly glued - it looks like most of them just had superglue poured on! Random bits stuck on- gun stuck to the outside of hands, the torsos of one model stuck onto the tiny legs of god knows what. Some have been basecoated, some haven't. Some have been painted with a billion layers, some have just been sprayed gold like tiny chaos-oscars.

It's going to be a hell of a lot of work to sort out, but worth it in the end :)

We tried out a few different paint strippers this week. Tried engine degreaser - managed to create a new ork model 'Mr Melty', tried fairy power spray, works awesome on metal models, dettol antiseptic, works awesomeon plastics! Originally wrote spastics there, glad I caught that :o

Also James' dad decided to help by taking out a little khorne berserker and power spray hosing it around the garden. The dog was very confused. Little spaniel is curently half shaved and looks like he has mange. Will get pics tomorrow.

Tuesday, 12 July 2011

Quickie

Just thought I'd post a few shots of my work space(s) before I take doggy for a walk. Spent the whole morning scribbling down ideas for diaramas and duels. Ideas I'll be good enough to use in about 5 years - woot!


Now to walk the beast.


Monday, 11 July 2011

Squeezy Bottles!

I went back to the hobby craft store and spent 20 minutes scouting out all the isles until I FINALLY found some stupid tiny squeezy bottles. Also ordered some off ebay but hey, having more of this stuff isn't a bad thing!


I mixed together my flow and retarder solutions and added sexy labels to my squidgy bottles using paint. I was far more excited about using this stuff than I think a normal person should be, but oh well.


I started on some elves - painting their cloaks bleach white. Basecoat colour went on amazingly with the flow added. About 3/4 coats in total, over black primer.


I love how creamy and smooth the colour looks. The paint was 50:50 flow solution and bleached bone paint.


When it was dry I threw on some layers of Grypphone Sepia wash;


But being impatient I proceeded to cock it up from there and not let things dry properly before I tried to highlight and blend. I think I tried to do too much in one evening and now my elves are sat on my desk looking embarassed about the state of their cloaks.


Tomorrow I'll try again, properly this time, and increase the concentration of the retarder as the paints still dried before I could get to blend them. Didn't stop me trying! And now they are lumpy lumpy models...

Let's get started!

I recently dug out all of my warhammer stuff after a couple of years creative haitus. With the summer off (3 month uni break - whoo!) I've decided I want to get back into everything. I've got quite a substantial army - Witch Hunters - with alot of it completely untouched. Thus far I've found;


Throne of Judgement
Penitent Engine
Exorcist
About 20 base coated sisters
About 30 Painted Sisters
2 St Celestine
2 Inquisitor Retinues
Various HQ models I can't remember the names of
C'tan the Deceiver
10 Seraphim
Box of Skeletons
Vampire's Carriage
Couple of Eldar Avatars
And some High Elf stuff I can't remember because I don't have it with me.
Random Lord of the Rings elves
Box of Galahad elves


In addition to that I discovered that even after 2 years of neglect in a box, my 100+ GW paints are all still usable. I have about 30 brushes, file sets, clippers, basing materials, glues, you name it.


My best mate went out the other day and bought himself the Space Marine and Orks big box set as well, so I've got some lovely ork stuff to paint up.


I started about a week ago by digging up some of the old elves I'd painted terribly and just spraying them over again. They are plastic so I couldn't be bothered to faff about stripping them. I just used them to get back into the swing of things a bit, and as can be expected from someone who hasn't painted for years they look awful!


Not bad for the first thing I've painted in ages I guess. I didn't go the whole hog because a) repainted managed to make lots of the details useless and b) my hands have the artistic control of a buffolo at the moment.


But it was great fun to get back into it. So much fun, in fact, that I went on a buying rampage at my local hobby craft store! I spent way too much money...


I picked up some flow improver and some fluid retarder (favourite name of the day) and some plastic glue;


Also grabbed some washed and paints I was missing (don't know why I forgot to bring black and white home with me)


And I got two Winsor and Newton brush sets. I have only just noticed that the mahogany set is polyester and not sable... urgh... I'll use them anyway - can never have enough brushes!


And I got myself a giant rainbow-gay chest of drawers to store all my nerdy secrets in;


There was also a sale in JJB next door but until I cover my clothes in paint I'll refrain from posting them here.


Annoyingly I couldnt find any dropper bottles to mix up my retarders/flows in. I'm withholding on painting until I can get those and properly thin my paints. I'm very neurotic about doing everything properly at the moment - I don't want to ruin anything expensive.


So yeah - from now on this blog is going to be my progress as I go from wtf end of this paintbrush do I hold to SUPER PAINTED GOLDEN DEMON extraordinare. With the occasional dog photo thrown in.