I've decided I'm just going to turn this blog into a generally all out geeky mumblefest. I don't paint enough to have a whole thing dedicated to it, but I do do enough random things to get up a post every other day. What has stolen my attention this time is a wii game by the name of Xenoblade Chronicles, which is so good that after having it for a week I ran (70 miles) to buy an HD PVR so I can record a let's play of it.
NNNNEEEEERRRDDDD.
I've been working on some snazzy banners and artwork for it. My elves are sat around half painted looking forlorn. Or they would do if I'd painted their faces.
But! No one is going to care what I write on my blog. The only people who read it are my mum and a bunch of russian websites trying to sell me air mail brides. I have to admire their tenacity and business acumen; targetting a site about miniature painting is going to pay off in the long run.
Tuesday, 29 November 2011
Friday, 18 November 2011
New - Clusters!
It's technically a lie, the cluster headaches aren't new. I've gotten them for five years in a row now. Luckily they've gotten better each year. First year I got them I'd start throwing up and would fall asleep for about 6 hours. You could've set fire to me and I wouldn't've roused.
These days it's still a killer headache and sometimes a migraine but I can open my eyes without hissing like a vampire in the sun.
Or sparkling!
But that's the latest excuse for no updates. Really hard to paint tiny men when one of your eyes is playing chase the black dots and the other has decided to deal with the ugliness of the world by employing blur-o-vision.
Elves are way more difficult to paint than I thought they would be, but I will be getting some more done this weekend.
Edit: Apparently a number of people have arrived at my blog this week by searching for dog+humping...
What the fuck?! Go away. Leave. Go to 'women and dogs.com'. Don't bring your animal purveying ways round these parts.
Monday, 14 November 2011
What's elven for clubfoot? And tiny wooly mammoths!!!
Parents brought the dog up the other day so we could all go to the pub together. Nice dog friendly pub around here. There were quite a few dogs inside and at a point we were all caught in the middle of a huge dog scuffle as they decided to meet greet and try to play in between our tables.
We had to wander outside to let destructo pup run around the little field behind the pub and calm down. Imagine our surprise when some wooly cows wandered up! Imagine a tiny wooly mammoth. It was awesome! Father had his super camera with him and managed to get lots of excellent photos.
Unfortunately father is a child and only sent me photos of the tiny mammoths humping each other.

He sent me this photo of dog though so all is forgiven. She is so cute and stupid :3

Onto elves! After being transported everywhere during the holidays my little box of elves had taken a beating and was being held together by hope and sticky tape.

As I said in my previous post the elves are surprisingly nice sculpts, although they do have a couple of horrible flaws, and there was little prep to do. I decided to try doing zenithal priming this time. Zenithal lighting refers to lighting that comes from above - like the sun or an overhead light, and the general shadows and highlights things have. I use undershading to help me do it - where you apply primer or a monochromatic basecoat that decides where the highlights and shadows fall and then glaze over it so it shows through.
I did it by priming black using plasticote, then using a white primer lightly dusting from above to a maximum of a 45 degree angle over the models. This was the general results.

I went a bit too heavy with the white by mistake. It really only needs to be a fine dusting over the raised parts - the spotty ness really doesn't matter. He kindof looks like he's got snow on his shoulders!
I picked out three models to use as tests and got started on the coat with 1:1:2 paint:matte medium:10% flow mixtures. It took a fair number of layers but it had a good consistency and went on very smoothly. I anticipate actually covering up the priming by doing manual highlighting and shading but that's because a) I still love doing excessive amounts of painting and layering and b) covering the priming doesn't bother me, I'm mainly using it to see where shading falls. Normally people use pre shading for speed painting, but I'm not at the moment.

To start with I worked on their inner cloak, using P3 frostbite. I want to highlight it up to white but the frostbite with give me a nice subtle blue to work up from and help tie the model together. I was careful to make sure each layer was fully dry before applying the next otherwise you just end up pushing pigment around and end up with chalkiness that's hard to cover.
Then I worked on the first colour of the cloak using P3 arcane blue. Finally I went over the metals and armour with boltgun. I can't decide yet whether I went the armour to be gold or silver or a mix. I figured I could base with silver to get a feel for it and then try gold. These are test models so I'm trying to make myself be more bold with colour choices. Gonna slather gold everywhere tomorrow!
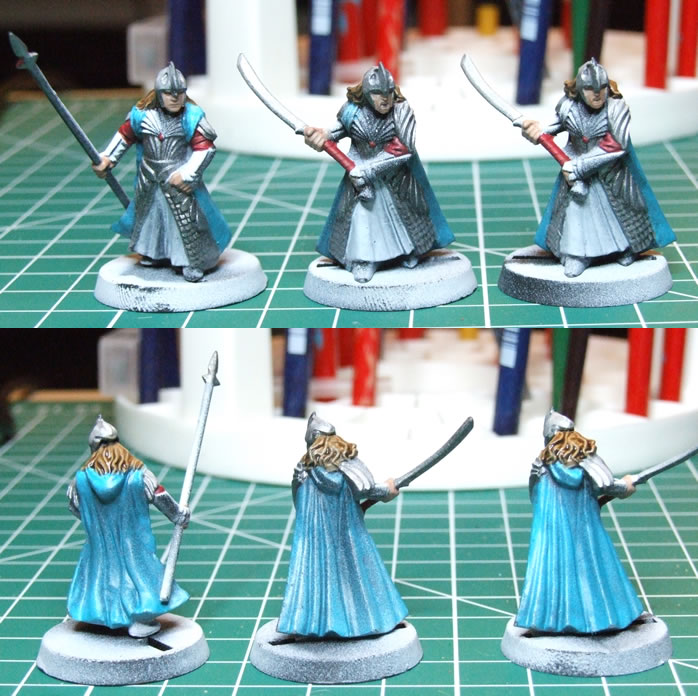
The hair was done with graveyard earth then a careful devlan mud wash. Originally I was going to use grypphonne sepia but I couldn't find it. I'm glad - the devlan mud looks much nicer. Skin was done with tallarn flesh and much cursing. I'm having trouble keeping my paints at a nice consistency and not having the paint just dribble everywhere.
It's not a problem on any other part of the models apart from the darn flesh bits!
The tiny gem at the centre of the breast plate and the cloth on the arms between armour sections was painted with scab red to compliment the turquoise and blue colours and draw the eyes upwards towards the centre of the model. I'm going to use browns with red base through the model as well such as on the shoes and wooden parts of the bows to further unify the paint scheme.
Overall these are really pleasant to paint and I'm looking forward to get some more done on them tomorrow.
Friday, 11 November 2011
I AM a corby trouser press
I had a little accident today, and then supplemented it by gasing myself.
I landed badly at trampolining - landed on my neck and then proceeded to kick the bed either side of my head. This isn't some bizarre trampoline sex euphenism, I just snapped myself myself in half at speed. I don't know if you've ever whipped you feet to your ears at the speed of light, like a faulty camping bed, the jaws of a starving alligator, or a corby trouser press used without the safety bar being inserted properly, but it is not a pleasant process.
And so I am bundled in quilts on my sofa hopped up on codeine products and paint fumes.
Earlier today I decided to put my Lord of the Rings elves together. I was anticipating ages of carefully filing and scalpeling off mould lines and fighting to fit horribly moulded clubfeet onto stumpily moulded legs. But... 3 mouldlines.
Out of all 24 models. I had to remove 24 mouldlines.
And they weren't big. They weren't in the best places - across the details of helmets and a bit of gauntlet.
But I had to remove 3 mouldlines.
Gluing them together was a bit more interesting, but nowhere near the trauma it had been on previous models. I don't like the new head stump thing they've got going on for attaching heads. It makes them look like they've done nothing but barbell shrugs for their long elfy life, or have been stung by a giant bee in the midst of battle and POOF - fat allergy neck.
The way their heads are attached to sprues is stupid as well. By the chins! Not the back of the head or somewhere that's going to be glued to something else and so hidden. No, you have to cut their chins off the sprue as slowly as possible so you don't warp their tiny chins and end up with Munch's the Scream elves.
Or Roger Ebert elves. But that would be awesome. That man unabashedly marks films up for having nice boobs in it, and gives decent reviews on top. If you've not heard of him, or watched Siskel and Ebert, go google it. And then go email Disney to tell them they are dicks for removing Ebert's tribute to Siskel on copy right groups.
Anyway!
I had to pick up a new black primer the other day - Plasti-kote. I was a bit wary at first. Trying new spray always makes me a bit over-cautious because removing and redoing a prime job is so tedious. It came out gorgeously though! Definitely my favourite so far. Now I'm excited about my white running out so I can run and buy some white plasticote! Although I also discovered where I can buy rustoleum so I might have to pick up some of that next.
FYI plasticote and Rustoleum are available from Homebase and B&Q, in England.
Spraying was not done with adequate ventilation or gas masky goodness so on top of codeine I am fffuuuullll of paint. Hence no photos and a lack of coherency.
Lesson of the day is that corby trousers presses will injure you if you put them on a trampoline and Roger Ebert is a breast loving elf.
Good times.
Tuesday, 8 November 2011
Demon's Souls Has Stolen my Own! (And my free time)
So boyfriend purchased Demon's Souls yesterday, and I have not yet stopped playing. Strangely I have managed to get quite a lot of studying done too, though I don't know how. I haven't managed to do anything miniature-y today, but I have made up my mind about something on the blog.
Before I figured if I wrote own guides and stuff I would read up on how to do things and learn much more myself in doing so. But I've found that when I go to learn about one thing so that I can read up on it, I end up reading hundreds of articles and then having to try out it myself in hundreds of different ways on different models. So it never gets written up. What I'm going to do instead is turn the guides and tutorial sections into a repository (originally wrote suppository there) of guides that I think are excellent on each topic.
Over time I'll obviously add my own, but I think it would be more useful and productive to do this for now.
So that's what I'm going to be up to for the next couple of days. As well as killing demons and stealing their souls and dying over and over and over and over and I'm still playing the same bit but I'm not bored what is going on and over and over.
:)
Monday, 7 November 2011
Greenstuff scalpels and blood loss oh my!
I started my day by cutting my hand open on the toilet. I know I know, toilet not known for being the sharpest item in existance. I responded appropriately and began to smoother my hand in every antibacterial item we had, including but not limited to; salvon liquid, savlon cream, germalene cream, canesten, kitchen power spray and a blowtorch. Then I spent ages wavering between thinking that my hand was irreversibly damaged by the toilet and I had managed to create the t-virus through my over zealous use of germ-murder-methods.
To distract myself I decided to cut every single limb I own with a scalpel. All of my tiny diamond files have gone on holiday but I had read guys saying they'd gotten better results removing flash and mould lines using a sharp scalpel. I can say for certain I am now a flash and mould line free zone. I am also free of a completely set of fingers and several pints of blood.
Every time I go into Tescos I find myself standing in the uhhh... plaster aisle, staring at the Mr Men pack of plasters. I could never bring myself to get the and pay the vast increase in price just to have a bit of my childhood stuck to myself. But tomorrow I am damn well going to go down there and buy the stupid plasters.
That way, the next time I decide to put together some stupid space barbies there will be an element of fun involved. Each time I create a new stab wound or slice into my body I can pick out a new Mr Man, until I am wearing the whole set! But what, I hear you ask, will you do if you get more cuts than there are Mr Men?!
Well I will start putting on a second of each. That way when I am finished and sat in a corner crying weakly, slowly bleeding to death through a thousand tiny cuts, I can play two-pair on myself so the last thing I do on the planet is something fun and not just senselessly mauling my fingers because there is too much plastic attached to this thing that doesn't really exist and is only an inch tall so who will know anyway?!
I look like a blind lady with Parkinson's decide to cross stitch using a hacksaw while tap dancing.
I did manage to put together a couple of choppas though, and I can confirm that using a scalpel leaves a much smoother result than filing most mould lines and takes less time. Choppas are also quite nice models but need a horrendous amount of gap filling.
These models were surprisingly free of awkward flash and mould lines. It was all very easy to take off. Just place the scalpel against the line, at right angles to it with the blade tilted towards the models. Pull it against and the excess plastic will come off like butter. Didn't have to worry about accidentally taking plastic off the surrounding model like I do with a file.

The choppas have little bits that clip together as you can see in the two halves of this one. I just blobbed some glue on the sticky out bits, and the edges of the gaps then stuck them together. The next bit to go on is the arms, which slot on as one piece and work to give the model extra stability. Then the head and the rotary parts go on. The rotary blades were a bitch to get to stay on. It was like the glue just stopped working.


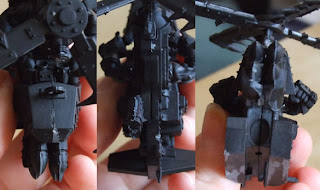 It's like they didn't even try to make it fit nicely. Someone in the office that day just went 'Nah huge gaps are so IN right now. Have them everywhere!' I could avoid it no longer - it was time to bring out the greenstuff.
I've got some generic brand greenstuff I got from my FLGS. It was 18inches for £5, instead of Games Workshop's 2cm for your firstborn. I will have to suffer the price at some point so I can use it and compare...
Now I overestimated how much greenstuff I would need by miles. I could've pulled off a tenth the amount I did and still have had loads left over once I'd finished filling this in.
 If you haven't used green stuff before, the picture on top is how it arrives. The blue and yellow pieces each form half of the compound you end up with. You don't need to mix them 50:50, but if you stray too far from this your greenstuff won't set, or will be too hard to use, etc. I stuck with 50:50 since it's my first time playing about with it.
Just push the two pieces together and pull them like taffy, then push and pull. Work them into each other firmly. When they are part of one mass start to roll them round in your hands. Roll it quickly into a sausage - the faster you roll it the warmer it'll get and the easier it'll be to smoosh together.
Here's a neat trick so you don't have to flip flop greenstuff every and end up with a lumpy bumpy sausage.
Roll whatever you're using into a rough cylinder. Then take something with a flat, sturdy bottom surface. Run this over the top of the cylinder like you're buffing it. The harder you push the thinner your sausage will end up. I use a pack of cards in a box that I had next to my desk.
To distract myself I decided to cut every single limb I own with a scalpel. All of my tiny diamond files have gone on holiday but I had read guys saying they'd gotten better results removing flash and mould lines using a sharp scalpel. I can say for certain I am now a flash and mould line free zone. I am also free of a completely set of fingers and several pints of blood.
Every time I go into Tescos I find myself standing in the uhhh... plaster aisle, staring at the Mr Men pack of plasters. I could never bring myself to get the and pay the vast increase in price just to have a bit of my childhood stuck to myself. But tomorrow I am damn well going to go down there and buy the stupid plasters.
That way, the next time I decide to put together some stupid space barbies there will be an element of fun involved. Each time I create a new stab wound or slice into my body I can pick out a new Mr Man, until I am wearing the whole set! But what, I hear you ask, will you do if you get more cuts than there are Mr Men?!
Well I will start putting on a second of each. That way when I am finished and sat in a corner crying weakly, slowly bleeding to death through a thousand tiny cuts, I can play two-pair on myself so the last thing I do on the planet is something fun and not just senselessly mauling my fingers because there is too much plastic attached to this thing that doesn't really exist and is only an inch tall so who will know anyway?!
I look like a blind lady with Parkinson's decide to cross stitch using a hacksaw while tap dancing.
I did manage to put together a couple of choppas though, and I can confirm that using a scalpel leaves a much smoother result than filing most mould lines and takes less time. Choppas are also quite nice models but need a horrendous amount of gap filling.
 |
| They look so harmless when they arne't covered in blood |
 |
| Snipped off the sprues |

The choppas have little bits that clip together as you can see in the two halves of this one. I just blobbed some glue on the sticky out bits, and the edges of the gaps then stuck them together. The next bit to go on is the arms, which slot on as one piece and work to give the model extra stability. Then the head and the rotary parts go on. The rotary blades were a bitch to get to stay on. It was like the glue just stopped working.

So here is Mr Choppa all put together. There's just one problem though...


I've got some generic brand greenstuff I got from my FLGS. It was 18inches for £5, instead of Games Workshop's 2cm for your firstborn. I will have to suffer the price at some point so I can use it and compare...
Now I overestimated how much greenstuff I would need by miles. I could've pulled off a tenth the amount I did and still have had loads left over once I'd finished filling this in.

Just push the two pieces together and pull them like taffy, then push and pull. Work them into each other firmly. When they are part of one mass start to roll them round in your hands. Roll it quickly into a sausage - the faster you roll it the warmer it'll get and the easier it'll be to smoosh together.
You just need to work it until it's a pretty uniform green colour. Mine's still slightly marbled above, I pushed it around a bit more after I photoed it.
Using a scalpel or any other sharp-ish tool, cut of a piece of the greenstuff off and roll it into a thin sausage.
 |
| Admire my sausage. Fear it!!! |
Roll whatever you're using into a rough cylinder. Then take something with a flat, sturdy bottom surface. Run this over the top of the cylinder like you're buffing it. The harder you push the thinner your sausage will end up. I use a pack of cards in a box that I had next to my desk.
Need to prep more photos before I can put the rest of this up, but enjoy it as it is...
Sunday, 6 November 2011
Fuck you, blogger
I wrote out a huge funny post then blogger messed up and I couldn't post it.
Fuck you blogger.
Fuck you blogger.
Thursday, 3 November 2011
Well what a surprise...
Gosh! I actually painted today. Only for an hour or so but I enjoyed it and finally got something done. I also spent frigging ages taping papers to lights and cameras to try and take some better pictures of the Dreadfleet stuff. I made improvements, but still havent got the types of pictures I want. I'm going to have to just suck it up at some point and making a little lightbox for myself!
Now onto proof!

Desk including essential; Nightmare Before Christmas mug, models, paints etc, massive stack of ignored chemistry work, and lp edutainment. And Island of Blood on the floor!
 I have some possessed ready to paint as Slaaneshi dudes, but I got distracted by these cool dudes shown handing out below.
I decided to use these guys to try out some Thousand Sons ideas. I started with a layed of enchanted blue, about 1:2 paint to water/matt medium.

Blue is the main colour with yellow as an accent. I didn't think too much about where I was putting it, just going with the flow and making sure I was as neat as possible because touching up yellow over blue paint will be a nightmare.

I started roughing in some of the yellow parts but left the arms off as I can't decide on the best way to paint those up yet. This first one has had a layer of sunburst yellow in the same mix as enchanted blue. Went on very nicely, to my surprise. I've been practising the whole zenithal priming thing on all my models to get started in speed painting. I watched some snazzy Miniature Mentor videos where a guy produced what I thought were gorgeous models in only a few hours that I'm trying to emulate.
I also used a heavy badab black wash on all the rigging, emblems etc on the terminator to bring out some of the details and fill on the parts I'm going to have dark anyway. I also gave the helmet a wash to see if it helped me pick out the details and shading easier.
The other one I'm going to do the secondary colour as chainmail/mithril silver with several washes of gryphonne sepia. This produces a gorgeous, aged gold colour. I think I will be going with that already but it's worth trying out the normal yellow first.
It's not much, but it's something.
Cat update! Found kitties owners and returned her. Then rescued her again today when I found her sat in the road oblivious to the cars beeping behind her. Silly deaf kitty :3
Now onto proof!

Desk including essential; Nightmare Before Christmas mug, models, paints etc, massive stack of ignored chemistry work, and lp edutainment. And Island of Blood on the floor!

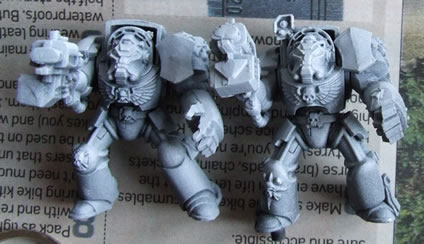 |
| Definitely bros. Probably more if they could get the suits off. |


I also used a heavy badab black wash on all the rigging, emblems etc on the terminator to bring out some of the details and fill on the parts I'm going to have dark anyway. I also gave the helmet a wash to see if it helped me pick out the details and shading easier.
The other one I'm going to do the secondary colour as chainmail/mithril silver with several washes of gryphonne sepia. This produces a gorgeous, aged gold colour. I think I will be going with that already but it's worth trying out the normal yellow first.
It's not much, but it's something.
Cat update! Found kitties owners and returned her. Then rescued her again today when I found her sat in the road oblivious to the cars beeping behind her. Silly deaf kitty :3
Wednesday, 2 November 2011
Protocol 10 will commence in 8 hours...
I finally finished Arkham City today! It was absolutely fantastic - I was one of those who found the final fights of Arkham Asylum to be tedious and anticlimatic but boy did they knock it out the park this time. So much fun! And actually difficult - but not just due to them throwing tons of enemies at you a la Asylum. It had it's flaws, of course. Whoever thought up the floating iceberg parts should never be allowed near a batman game again. The first few hours I spent playing I couldn't work out if I was enjoying myself as much as I thought I should be because I much prefer linear games, but the open world really is well done and definitely grew on me.
Now I'm forcing my boyfriend to brute force his way through to the end so I have someone to talk to about it!
That is my excuse for not getting the rest of the Dreadfleet preview done. I hit a part where I just couldn't stop playing and had to keep going. But now it's over and I doubt I will spend hundreds of hours collecting Riddler trophies and obssessively perfecting my performance in challenge rooms... Hmm, maybe I should give up on blogging.
Nein! I went to my FLGS today and picked up a couple of the small and fine citadel detail brushed, and a new pot of chainmail to replace my sad dried up one, and a pot of frostbite. I'm planing on using the frostbite on my High Elves, if I ever actually get around to them.
I don't know. I've just been very apathetic since uni started again and I'm not sure why. I'm looking for something to shock me back into action. Studying, painting, blogging, excercising. I think I just need to knuckle down and get on with it rather than waiting for god to strike me with an almighty innovative lightning bolt.
I will paint tomorrow! And study! And do labs! And challenge rooms! Soooo many challenge rooms...
Tuesday, 1 November 2011
Dreadfleet - Review

Thusly Games Workshop introduces their latest one off game - Dreadfleet! Much like space hulk it functions as a standalone game for two or more players, and comes with everything you need to start playing off the bat. You and your enemy can either take control of the titular Dreadfleet, or the Grand Alliance. Unfortunately sound effects aren't included, but if you can't - or your friends wont - make medieval pew pew noises while you imagine sending cannonballs and sea drakes to obliterate your foes then you are lame.
I haven't had a chance to play yet, myself, because I'm very finicky about painting and modding everything perfectly before I use something. I have seen people at the local GW play it though and overall it seems like a very popular game now, and a nice changeup from traditional tabletop skirmishes or wars.
The game was released in limited numbers to each Games Workshop and independant retailer. Interestingly whereas all the GWs I've visited sold out in the first weekend, all the FLGS (Friendly local gameshops) I've been too still have stacks of them left. Maybe if you're more used to Warmahordes or Malifaux the Dreadfleet won't appeal so much.
If you are still looking for a copy near Leicerster, check out Tabletop Tyrant. They had loads left when I popped in.
Now onto the contents of the box!
It's a stand £70 boxset, much like the army boxes and Island of Blood/Assault on Black Reach sets. Ofcourse you can get it at a standard 10-20% off at independant retailers. I was happy with the price though - my mum grabbed it for me from Games Workshop as an early christmas gift.
The actual box itself has some gorgeous designwork - fantastic artwork on top and a gorgeous picture of a game in play on the bottom. It's also a very sturdy and strong box. My AoBR box is now 80% masking tape but I can see this box lasting very well even as I move it from place to place. It would be nicer if more of their boxes were of this quality to be honest.

It's also one of the only things I've been able to unpack and repack neatly without having to bend the laws of time and space.

The back of the box promises the following contents;


I'm pleased to say that my box came with everything! The wind gauge, navigation rod etc are found in the sprues to be glued together and painted. And the instruction book is downstairs which is too far for me to walk right now...
So rather than flicking through sets of books for rules and damage etc most of the action is self contained in the cards you can see. These are also quite sturdy and have snazzy artwork.


The mat is 5' x 9', and you can throw it anywhere. I can confirm it is large enough to use as a blankie.
Photo soon!
Now in general Games Workshop's plastic sets and sprues have been a hell of a lot nicer recently. Detail,
strength, design. Thankfully the Dreadfleet is no exception.

Here you can see the scenery that comes for the board. Islands and shipwrecks to be navigated by your tiny armada. Most of them are really nice; however I really don't like Games Workshop's habit of using malformed skulls everywhere in all of it's scenery these days. A few too many of these pieces are just boring poorly sculpted skulls and flat sides for my liking, but the others include a fortress, shipwrecks, and uhh... fuck it most of them are crap skulls >: |
Most of the navigation pieces are on this sprue too, as you can see on the right and down the bottom. These actually have a good amount of effort put into their design for what effectively are coins to flip and rulers to measure.
Sprue number two to come out is half the size of this (A3 sized) one.

 |
| Skabrus on the sprue and painted by GW |
The awesome Skaven ship - carved from the body of an Orb Leviathan (aka Anglerfish) captained by an awesome undead skaven pirate lord, Skretch. This Orb Leviathan (after it's role in Finding Nemo) destroyed Skretch's original fleet and then manage to swallow his flagship whole, taking captain and crew with it. Who then took the most obvious course of action and ate the fish from the inside out, which was then brought back to life by captain Noctilus.
As silly as the backstory is I can't help but find this one adorable for it's tiny warpstone bell mounted afront the fish's head like an evil escas. More evil escas... Very skaveny indeed.
A ship made to enact revenge on Captain Roth for raiding the tombs of Zandri, made using the bricks of the tombs themselves using the hooded Necrosphinx of Zandri as it's figurehead. Also onboard are various titans, obelisks, giant sun ray shooting sapphire and hundreds of tireless undead power rowing. It is kept afloat by MAGIC.
The fluff on this one is a bit sillier - if someone kept stealing your stuff, would you turn that stuff into a boat and then sail it to them?
The detail on this one is nice, especially the hundreds of tiny oars. Ties very neatly into the new tomb kings designs and themes, although I find the scaling to be a bit off. I find the pyramidal structure doesn't have proportionate detailing and does make me feel like I'm looking at a tiny plastic ship, rather than a large cow very far away. Uh, ship.
 |
| The Curse of Zandri on sprue and painted by Games Workshop |
The fluff on this one is a bit sillier - if someone kept stealing your stuff, would you turn that stuff into a boat and then sail it to them?
The detail on this one is nice, especially the hundreds of tiny oars. Ties very neatly into the new tomb kings designs and themes, although I find the scaling to be a bit off. I find the pyramidal structure doesn't have proportionate detailing and does make me feel like I'm looking at a tiny plastic ship, rather than a large cow very far away. Uh, ship.
Sunday, 30 October 2011
Kitty cat Rescue
My plans for today were thrown for a loop by the arrival of a tiny malnourished kitty appearing in my kitchen! I spent the afternoon looking after her and poddling her :)
Saturday, 29 October 2011
Dreadfleet, Island of Blood and Arkham City oh my!
So I have managed to do sod all posting in nearly a month. I completely burned myself out on painting and making things. I have become uber lazy and useless in pretty much all aspects of my life annoyingly. But parent visited a couple of weeks ago and bought me Dreadfleet as an early christmas present. The week after I caved and recklessly bought Island of Blood to sate my elf and skaven needs.
Then this week I got a limited edition Arkham City as another early christmas present and that managed to blow any plans to paint and/or study out of the water! As with arkham asylum I'm ending up sinking more time into a single challenge room than the rest of the game combined.
But my desk is set up for painting - thinking maybe a change of place to something more comfortable will help me get going. I crippled myself in the gym today and trampolining yesterday so am going to be housebound tomorrow. My desk is right next to my bed so it will be minimal effort to slink out in my pjs onto my super comfy chair and actually do some painting! Or so I hope...
I've decided to put the orks away for a bit. I wasn't painting my nobz in a very economical manner and it means I've just gotten damn bored of them. Also shuffling them around loads means that I have misplaced a head and an arm. I did learn alot from them though.
I much prefer layering to wet blending, no matter how many coats it takes. I will have to learn to just put up with my models being glued together before I start: trying to put the ork arms on now there is a visible alignment issue that I could've fixed at the beginning with glue or greenstuff that I would now have to ruin painting to fix. I've learnt what to add and eliminate from my painting process to to make the whole thing smoother and more efficient.
I have a bunch of tanks, possessed and general chaos space marine-y goodness prepped, primed and ready to paint. I will be getting on with those for a bit!
Will need to remember to bring the camera upstairs so I get pictures...
Am also planning to do a review of the dreadfleet and island of blood boxsets. I should've remember to do the assault on black reach one but I'd pulled most of it out and used it before the idea occured to me.
See you tomorrow!
Saturday, 15 October 2011
Macro
I finally found the macro button on the camera
I have been struck down with freshers flu and so have been curled up in blankets making bases all day
Here's a decent photo of the first bunch I finished


I have been struck down with freshers flu and so have been curled up in blankets making bases all day
Here's a decent photo of the first bunch I finished


Friday, 14 October 2011
MSN Meltdown
Well I was going to do some updates tonight but my MSN has readded every person I've ever had on there and I'm going to be spending my evening sorting through a lot of confused people. I had one of those hopeful moments when some people I've not spoke to for ages or fell out with popped up and I thought I'd chat to them again.
Alas I did not have the courage!
Mmm this is possibly more fun than filing a hundred skaven...
Alas I did not have the courage!
Mmm this is possibly more fun than filing a hundred skaven...
Tuesday, 11 October 2011
Tutorial - Bases - Sand/Desert temple
Recently I just finished a set of bases that look great in person but I cannot take a good photo of to save my life.
So what I wanted was a bleached out but warm look on my bases, and have them look like they were part of an area that belonged in the desert in the great temple and ruins left to be worn down by sand and time. My mental image was inspired by my childhood memories of going to egypt and then thinking about how everything I saw would look in thousands of years when it had been abandoned.
You can start every single base, pretty much, the same way. It only really matters two or three steps in, or when you start painting, as to whether you end up with stone bases, sand bases or even jungle bases. If you are short on time but want to have hand made bases for all of your army, the first few stages are very quick even when doing an armies worth. When it comes to painting and adding elements, you can just pull a few aside at a time and paint them up. The rest will store fine until you feel like dipping them in glue and grass.
I guess I should get on with the tutorial bit...
Materials:
Cork sheets
PVA glue
Sand Mix
Paint
Extras (To give your bases extra pizaz, but not necessary for good basing if you're tight on time or money):
Static Grass
Tufts
Mini foliage
Wire
Modelling stuff (Greenstuff, fimo, milliput, etc)

When you rip your cork you will end up with slanted edges. Take these into account when gluing your pieces down. Have a nice variation between little outcroppings and slopes.
Cover your cork in glue and squidge them onto your bases. Make sure you cover the slot if it has one. I always make sure that the slot is covered by a single cork piece to make pinning a model through it easier.
If you want more interest in your base, tear the cork into smaller pieces and arrange them in different ways before gluing them down. Add layers! I'm sticking with simple one pieces bases for this group.

To cover the rest of the base just blob down some PVA. Spread it around with a brush. As long as you clean it before it dries a brush you dip in PVA will be fine. Probably shouldn't do it with winsor and newtson's though.
 Once all your bare base is covered drop it into your sand pit. This is the important bit that can make or break the realism of your tiny man bases. You need a mix of sizes - at least three from tiny grains to rocks. In mine I have fine play sand, buff, small talus, medium talus, large talus, coal. Depending on how you've stirred it or shaken it up will affect what mix you get on your base, but its the random variation that makes it look more natural and less synthetic. Read more here.

I forgot to take a photo post sanding - but here's what they look like after the first basecoat. When paintingover cork you need to seal it with something first or it will absorb whatever you put on it. Most people use thinned PVA (1:1 glue:water) but I just gave them a couple of go overs with spray primer.
The next few stages are just dry brushing your appropriate colours on. For my theme I used warm creamy colours. I smothered the sandy parts with a variety of gryphonne sepia, devlan mud, mixes of both to give it some shadowing and variation. Once that was dry I drybrushed the tops with menoth white base. The larger 'boulder' type rocks I gave a very heavy drybrush of pale sand by vallejo. The tops got a wash of ivory by vallejo, 1:1 paint to water. When this was dry the top is given a wash of gryphonne sepia. To get the dappled look and to add more visual interest don't apply the wash evenly. Make sure everything is covered but apply it with a swirling motion.

Time for pretend dry grass! I'm using the games workshop dry/dead grass because it's actually quite nice for small simple sections. Add a blob of glue where you want it - try not to make the bases too busy and choose places it wouldmake sense to have your extra features.
You can apply the grass in a number of ways. Either sprinkle it over, or do what I do.

I pinch the grass tightly between my fingers and poke it into the glue a few times. This helps it stick out in one direction more rather than getting floppy sad grass.

Then turn it upside and tap it on the bottom side of the base. This gets rid of excess and also makes it stand upright. Put aside to dry.

If you aren't keen on having grass on more than a few bases at least have some on hand for ones like this one. You can see at the middle bottom one of the stones was loose so I pulled it off. Otherwise it would've come off randomly in play or transport. Just blob some glue in there, add grass, and it's fixed in ten seconds.

 |
| Admire my blurry bases! I bet if they were blurry in real life everyone would buy them... |
You can start every single base, pretty much, the same way. It only really matters two or three steps in, or when you start painting, as to whether you end up with stone bases, sand bases or even jungle bases. If you are short on time but want to have hand made bases for all of your army, the first few stages are very quick even when doing an armies worth. When it comes to painting and adding elements, you can just pull a few aside at a time and paint them up. The rest will store fine until you feel like dipping them in glue and grass.
I guess I should get on with the tutorial bit...
Materials:
Cork sheets
PVA glue
Sand Mix
Paint
Extras (To give your bases extra pizaz, but not necessary for good basing if you're tight on time or money):
Static Grass
Tufts
Mini foliage
Wire
Modelling stuff (Greenstuff, fimo, milliput, etc)

Rip some of your cork off. Tear it up into maneagle chunks roughly the size of your bases. Make sure you don't leave any pieces with a perfectly straight edge as it won't look natural. Save these pieces though, they can come in handy.
 |
| What is it? It's chunky... Well what's it got in it? ...Chunks |
 |
| I spent ages trying to take this picture that didn't make me look like I have massive man hands. Thanks for the genetics mum! |
If you want more interest in your base, tear the cork into smaller pieces and arrange them in different ways before gluing them down. Add layers! I'm sticking with simple one pieces bases for this group.
 |
| I like to use precariously balanced glasswear to hold my bases in place |
Now put something heavy on top of them and leave the glue to dry. PVA is useless at holding things in place until its dry - then it's great, so make sure you drop something on top even if you think you don't need it.


The pale ones are basecoated with 1:1 graveyard earth:water which is a gorgeous colour, and the red ones are the same but with bestial brown instead. Gives a give red earthy tone.
 |
| Here the bases have been completely dry brushed and you can see the wash drying in a dappled pattern |
The next few stages are just dry brushing your appropriate colours on. For my theme I used warm creamy colours. I smothered the sandy parts with a variety of gryphonne sepia, devlan mud, mixes of both to give it some shadowing and variation. Once that was dry I drybrushed the tops with menoth white base. The larger 'boulder' type rocks I gave a very heavy drybrush of pale sand by vallejo. The tops got a wash of ivory by vallejo, 1:1 paint to water. When this was dry the top is given a wash of gryphonne sepia. To get the dappled look and to add more visual interest don't apply the wash evenly. Make sure everything is covered but apply it with a swirling motion.

You can apply the grass in a number of ways. Either sprinkle it over, or do what I do.

I pinch the grass tightly between my fingers and poke it into the glue a few times. This helps it stick out in one direction more rather than getting floppy sad grass.

Then turn it upside and tap it on the bottom side of the base. This gets rid of excess and also makes it stand upright. Put aside to dry.
If you aren't keen on having grass on more than a few bases at least have some on hand for ones like this one. You can see at the middle bottom one of the stones was loose so I pulled it off. Otherwise it would've come off randomly in play or transport. Just blob some glue in there, add grass, and it's fixed in ten seconds.

Here's the finished lot! It took me a couple of hours to do, including all drying time except for priming (which I always leave overnight.) All I have to do now is give the rims a coat of graveyard earth!
Make sure your rim colour matches your bases - don't just go for black. On ones like these you must go for a lighter colour or it destroys the composition completely and makes the bases look awful.
I hope this comes in handy - happy base making!
Monday, 10 October 2011
Sandstone temple bases
Finally, after hundreds of destroyed bases and throwing sand all over my house, I have come up with some bases I am happy with for my sand/desert and temple theme.

As you may notice these pictures are rubbish - I have a new camera and have no idea how to use it.
Good times
As you may notice these pictures are rubbish - I have a new camera and have no idea how to use it.
Good times
Subscribe to:
Posts (Atom)